|
Archive for the 'allotment' Category
Tuesday, February 17th, 2026
🧹 Step-by-Step Allotment Rescue Plan
1. Assess and Prioritise
- Walk the whole plot and take photos.
This is REALLY important. It’ll help you keep track of how well you’re doing.
- Identify key zones: access paths, usable beds, compost area, water source.
Think about where the sun comes up and which bits are shaded.
- Note hazards (glass, metal, brambles) and useful salvage (tools, pallets, compost bins).
Make a note of which need to be cleared first and how you’re going to do that safely.
2. Clear the Perimeter First
- Tidy the edges so you can move freely.
- Cut back brambles and nettles with loppers or a strimmer.
I think brambles are too awful to compost – you could shred them if you can get a shredder working on your allotment.
- Mark out paths with string or wood to avoid trampling future beds.
Start thinking about where you’ll get paving slabs from if you want them. They’ll be hiding in skips and people you know will be getting rid of them.
3. Remove Rubbish and Large Debris
- Sort into: reuse, recycle, landfill.
Protect your car if you’re taking dirty stuff to the tip. Try to dry things before putting them in your car.
- Stack useful items (wood, buckets, mesh) neatly for later use.
Make it look tidy. Don’t stack too high.
- Wear gloves and check for nails, glass, or vermin nests.
Watch out for scratches and cuts.
4. Tackle Weeds and Grass
- For grassy areas: strim first, then cover with cardboard and compost to suppress regrowth.
This can be really satisfying. But doesn’t remove the number of weeds. Just makes them shorter.
- For deep-rooted weeds: dig out manually or use a weed fork. Dig as much root out as possible.
- Avoid rotavating until you’ve cleared perennial weeds like bindweed or couch grass. Don’t rotavate lots of weeds.
5. Create One Working Bed
- Choose the sunniest, least overgrown corner. It’ll be easiest and get good results.
- Clear it fully, add compost, and sow something easy (radishes, lettuce, beans). Radish are really quick!
- This gives you a psychological win and a visual win! And something to eat.
6. Use Covering Techniques
- Lay cardboard, tarps, or weed membrane over untouched areas. This is the start of no-dig. Add compost or muck on top. This can get expensive and be as much hard work as digging.
- Covering buys you time and prevents further weed growth.
- Weight covers with bricks or logs. Else it all blows away.
7. Build a Compost Corner
- Use pallets or old bins to start composting green waste. You’ll find pallets on Freecycle or by asking around. Someone will always know who has some spare.
- Add layers of weeds (not seed heads), cardboard, and kitchen scraps.
Layer it up. Keep adding it.
Store bad roots in an old compost sack turned inside out.
- This keeps the site tidy and builds future fertility.
🛠 Tools That Help
| Tool |
Use |
| Loppers & secateurs |
Brambles, woody stems |
| Strimmer |
Long grass, nettles |
| Fork & spade |
Digging out roots |
| Tarps/cardboard |
Weed suppression |
| Gloves & boots |
Safety |
🌱 What to Plant First
Start with easy, fast crops in your cleared bed:
- Radishes, lettuce, rocket
- Dwarf beans, peas
- Calendula or nasturtiums (for cheer and pollinators)
🧠 Tips to Stay Motivated
- Work in 2-hour blocks, not full days. Little and often.
- Take before-and-after photos. This is your reminder of how much you’ve done.
- Celebrate each cleared section.
- Invite a friend for a “clear and cuppa” session. Enjoy it!
Filed: allotment
Tuesday, February 17th, 2026
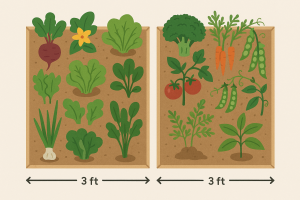 June Planting Guide for Your Two 3×2 ft Beds June Planting Guide for Your Two 3×2 ft Beds
June is when your little beds shift fully into summer mode. Growth is fast, watering matters more, and you can still sow plenty of productive crops. This sheet continues the March–April–May sequence so your two compact beds stay abundant and tidy.
1. Refreshing the Beds in June
Light Soil Care
- Remove spent crops: Any bolted lettuce, tired rocket, or finished peas.
- Top up compost: Add ½ inch of compost to keep nutrients steady.
- Loosen gently: Aerate the top layer without disturbing established roots.
- Water deeply: June warmth means deeper, less frequent watering is best.
2. What to Plant in June
June is ideal for heat-loving crops and final sowings of some spring favourites.
Suitable Vegetables
- Leafy greens: Chard, perpetual spinach, heat-tolerant lettuce
- Roots: Beetroot, carrots (early June), radishes (early June)
- Legumes: French beans, runner beans, dwarf beans
- Brassicas: Kale (early June), kohlrabi
- Herbs: Basil, parsley, coriander (bolt-resistant varieties), dill
- Others: Spring onions, salad turnips
3. Updated Bed Plans for June
These layouts assume you’ve followed the earlier months and now want to keep the beds productive through summer.
Bed 1: Summer Greens & Herbs
- Front row (1 ft): Sow basil or parsley in gaps left by spring onions or radishes
- Middle row (1 ft): Chard or perpetual spinach continues; fill gaps with heat-tolerant lettuce
- Back row (1 ft): Kale or kohlrabi from May continues; sow more kale early June if space allows
Notes:
- Basil thrives in warm, sheltered beds.
- Chard will carry you through summer and autumn.
Bed 2: Beans & Summer Roots
- Front row (1 ft): Final sowing of beetroot for summer harvest
- Middle row (1 ft): Carrots continue; sow last batch early June
- Back row (1 ft): French beans or dwarf runner beans take over as peas finish
Notes:
- Beans love the heat and will crop heavily in small spaces.
- Keep carrots shaded during germination to prevent drying.
4. June Planting Tips
- Water deeply: Aim for fewer, deeper waterings to encourage strong roots.
- Mulch: A thin layer of compost or straw helps retain moisture.
- Harvest often: Picking beans and greens encourages more growth.
- Shade seedlings: Use a board or cloth for the first few days after sowing.
- Watch for bolting: Coriander and lettuce may bolt; choose bolt-resistant varieties.
5. At-a-Glance June Chart
| Crop |
Sow in June |
Spacing |
Notes |
| Chard |
Yes |
8–10 in |
Heat-tolerant |
| Perpetual spinach |
Yes |
8 in |
Reliable summer green |
| Lettuce (heat-tolerant) |
Yes |
6–8 in |
Choose summer varieties |
| Basil |
Yes |
8–10 in |
Loves warmth |
| Beetroot |
Yes |
4–6 in |
Final sowings |
| Carrots |
Early June |
Thin to 2–3 in |
Keep moist |
| French beans |
Yes |
6 in |
Heavy summer crop |
| Runner beans (dwarf) |
Yes |
8 in |
Needs support |
| Kale |
Early June |
12 in |
Summer leaves |
| Spring onions |
Yes |
1 in |
Slow but steady |
6. Summary
June is when your beds hit their stride. With beans climbing, chard thriving, and herbs filling the gaps, your two compact beds stay lush, colourful, and productive right through the warmest months.
Filed: allotment
Tuesday, February 17th, 2026
 May Planting Guide to Continue Your Two-Bed Plan May Planting Guide to Continue Your Two-Bed Plan
This sheet builds on your March and April beds, helping you transition into warm-season planting while keeping both 3 ft × 2 ft beds productive and tidy.
1. Refreshing the Beds in May
Light Soil Care
- Remove finished crops: Early radishes, bolting spinach, or tired rocket.
- Top up compost: Add ½ inch of compost to maintain fertility.
- Loosen gently: Avoid disturbing roots of crops still growing well.
- Water deeply: May can be dry; moisten soil before sowing.
2. What to Plant in May
May opens the door to warm-season vegetables while still allowing some cool-season sowings.
Suitable Vegetables
- Leafy greens: Lettuce, chard, perpetual spinach
- Roots: Beetroot, carrots, radishes
- Legumes: French beans, runner beans, peas (final sowings)
- Brassicas: Kale, kohlrabi, broccoli (late May)
- Herbs: Basil (late May), parsley, coriander, dill
- Others: Courgettes (if you have space elsewhere)
3. Updated Bed Plans for May
These layouts assume you’ve followed the March and April plans and now want to transition into early summer cropping.
Bed 1: Greens & Heat-Tolerant Crops
- Front row (1 ft): Final sowing of radishes + spring onions
- Middle row (1 ft): Replace any bolted lettuce with chard or perpetual spinach
- Back row (1 ft): Sow kale or kohlrabi for summer and early autumn harvests
Notes:
- Chard thrives through summer and autumn.
- Kale sown now gives tender summer leaves.
Bed 2: Roots & Beans for Summer
- Front row (1 ft): Third sowing of beetroot
- Middle row (1 ft): Carrots continue; sow more if gaps appear
- Back row (1 ft): French beans or runner beans (dwarf varieties suit small beds)
Notes:
- Beans love warmth; May is ideal.
- Keep soil moist for carrots as temperatures rise.
4. May Planting Tips
- Water consistently: Young plants dry out quickly in May.
- Shade seedlings: Use a light cloth or cardboard on very hot days.
- Mulch: Helps retain moisture and suppress weeds.
- Watch for pests: Slugs, aphids, and flea beetles become active.
- Support beans: Add canes or a small wigwam for climbing varieties.
5. At-a-Glance May Chart
| Crop |
Sow in May |
Spacing |
Notes |
| Lettuce |
Yes |
6–8 in |
Choose heat-tolerant varieties |
| Chard |
Yes |
8–10 in |
Long-season crop |
| Perpetual spinach |
Yes |
8 in |
Heat-tolerant |
| Radish |
Early May |
2–3 in |
Last sowings before heat |
| Beetroot |
Yes |
4–6 in |
Succession sow |
| Carrots |
Yes |
Thin to 2–3 in |
Keep moist |
| Peas |
Early May |
2 in |
Final sowings |
| French beans |
Yes |
6 in |
Loves warmth |
| Runner beans |
Yes |
8 in |
Needs support |
| Kale |
Yes |
12 in |
Summer leaves |
6. Summary
May is the month your beds shift from spring to summer. With fresh sowings of beans, chard, and heat-tolerant greens, plus continued roots, your two compact beds will stay productive and colourful right through the warm months.
Filed: allotment
Tuesday, February 17th, 2026
April Planting Guide
For your two 3 ft × 2 ft beds you planted in March. It keeps both beds productive, adds new crops as space opens, and prepares you for steady harvests into summer.
1. Refreshing the Beds in April
Light Soil Preparation
- Remove spent crops: Harvest remaining radishes or early lettuce thinnings.
- Top up with compost: Add a thin ½–1 inch layer of compost to replenish nutrients.
- Gently loosen the surface: Avoid disturbing roots of crops still growing.
- Water before sowing: Damp soil helps April seeds germinate quickly.
2. What to Plant in April
April allows you to introduce slightly warmer-season crops while continuing cool-season sowings.
Suitable Vegetables
- Leafy greens: Lettuce, spinach, chard, rocket
- Roots: Carrots, beetroot, radishes (succession sow)
- Legumes: Peas, dwarf French beans (late April)
- Brassicas: Kale, kohlrabi
- Herbs: Parsley, dill, coriander, chives
3. Updated Bed Plans for April
These layouts assume you planted the March plan and now want to extend productivity.
Bed 1: Greens & Fast Crops
- Front row (1 ft): New sowing of radishes + spring onions
- Middle row (1 ft): Continue harvesting cut-and-come-again lettuce; fill gaps with chard or rocket
- Back row (1 ft): Spinach continues; sow kale or kohlrabi in any open patches
Notes:
- Chard provides colour and long-season harvest.
- Kale sown now will be ready for summer picking.
Bed 2: Roots & Beans
- Front row (1 ft): Second sowing of beetroot
- Middle row (1 ft): Carrots continue; sow more if space allows
- Back row (1 ft): Peas continue; in late April, add dwarf French beans once frost risk drops
Notes:
- Beans need warmer soil; sow only after mid–late April.
- Keep peas well-watered as temperatures rise.
4. April Planting Tips
- Succession sowing: Sow small amounts every 2–3 weeks for continuous harvests.
- Thin seedlings: Give carrots and beetroot space to grow.
- Mulch lightly: Helps retain moisture as days warm.
- Watch for pests: Slugs love young seedlings; use barriers or traps.
- Support peas: Add extra twigs or netting as they climb.
5. At-a-Glance April Chart
| Crop |
Sow in April |
Spacing |
Notes |
| Lettuce |
Yes |
6–8 in |
Fill gaps from March crops |
| Chard |
Yes |
8–10 in |
Long-season harvest |
| Rocket |
Yes |
4–6 in |
Fast and reliable |
| Radish |
Yes |
2–3 in |
Ideal for succession |
| Beetroot |
Yes |
4–6 in |
Second sowing now |
| Carrots |
Yes |
Thin to 2–3 in |
Keep soil moist |
| Peas |
Yes |
2 in |
Continue from March |
| French beans |
Late April |
6 in |
Needs warmth |
| Kale |
Yes |
12 in |
Plant in gaps |
6. Summary
With these April updates, your two compact beds stay productive and varied. You’ll enjoy a mix of fast crops, leafy greens, and developing summer vegetables, all from simple, small-space planning.
Filed: allotment
Tuesday, February 17th, 2026
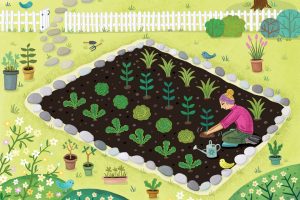 March Planting Guide for Two Small Vegetable Beds March Planting Guide for Two Small Vegetable Beds
This sheet provides a clear, practical plan for planting two vegetable beds, each measuring 3 ft by 2 ft. It includes what to plant in March, how to prepare the soil, and simple layout suggestions.
1. Preparing the Soil
Steps for Both Beds
- Clear the surface: Remove weeds, old roots, stones, and debris.
- Loosen the soil: Use a hand fork or trowel to gently break up the top 6–8 inches.
- Add organic matter: Mix in 1–2 inches of compost or well-rotted manure to improve structure and fertility.
- Level and firm: Lightly pat the soil so it’s even but not compacted.
- Water lightly: Moisten the soil a day before planting so it’s damp but not soggy.
2. What to Plant in March
March is ideal for hardy, cool-season vegetables. These crops tolerate chilly nights and short days.
Suitable Vegetables
- Leafy greens: Lettuce, spinach, rocket
- Roots: Carrots, beetroot, radishes
- Alliums: Spring onions
- Herbs: Parsley, coriander
- Others: Peas, broad beans (if not already started)
3. Bed Layout Plans
Each bed is 3 ft × 2 ft. The layouts below maximise variety and productivity.
Bed 1: Quick Growers & Cut-and-Come-Again Greens
- Front row (1 ft): Radishes (quick harvest) + Spring onions
- Middle row (1 ft): Mixed lettuces (cut-and-come-again)
- Back row (1 ft): Spinach or rocket
Notes:
- Sow radishes every 2–3 weeks for continuous harvest.
- Lettuce and rocket can be harvested leaf-by-leaf.
Bed 2: Roots & Longer Growers
- Front row (1 ft): Beetroot (spaced 4–6 inches apart)
- Middle row (1 ft): Carrots (thin seedlings as they grow)
- Back row (1 ft): Peas (dwarf variety) with a small support frame
Notes:
- Peas benefit from a simple twiggy support.
- Carrots prefer fine, stone-free soil.
4. Planting Tips
- Spacing: Follow seed packet guidance; overcrowding reduces yield.
- Watering: Keep soil consistently moist, especially for germinating seeds.
- Protection: Use fleece on cold nights to protect young seedlings.
- Succession sowing: Re-sow fast crops like radishes and lettuce for steady harvests.
5. At-a-Glance Planting Chart
| Crop |
Sow in March |
Spacing |
Notes |
| Lettuce |
Yes |
6–8 in |
Harvest outer leaves regularly |
| Spinach |
Yes |
6 in |
Prefers cool weather |
| Rocket |
Yes |
4–6 in |
Fast-growing |
| Radish |
Yes |
2–3 in |
Ready in 4–6 weeks |
| Spring onions |
Yes |
1 in |
Slow but reliable |
| Carrots |
Yes |
Thin to 2–3 in |
Needs fine soil |
| Beetroot |
Yes |
4–6 in |
Harvest young or mature |
| Peas |
Yes |
2 in |
Provide support |
6. Summary
These two compact beds will give you a steady supply of greens, roots, and peas from spring into early summer. With simple soil preparation and regular sowing, you can keep both beds productive and tidy throughout the season.
Filed: allotment
Monday, April 15th, 2024
It’s often at this point in the year that you realise your shed isn’t going to last another year. Felt can be replaced and walls patched, but there comes a time when you know a new shed is the best option.
BillyOh sell a massive range of sheds suitable for all gardens and allotments.
Your first thought has to be how big a shed do you want? If you’re on an allotment you might be restricted by the lease or tenancy in terms of what size you can have. A 6ft by 8ft shed is perfect for an allotment.
Then you need to decide if you want to have a window, and what sort of door you want. Then you can look at the options of having a pent roof,
Choosing between overlap and tongue and groove for a shed largely depends on your preferences, budget, and the desired aesthetic. Here’s a breakdown:
1. **Overlap Cladding**:
– **Pros**: Generally more affordable compared to tongue and groove. Offers good weather protection when installed correctly. It has a traditional rustic look, which some people prefer for sheds.
– **Cons**: Can be less durable and secure compared to tongue and groove. Over time, the overlapping boards may warp or allow water ingress if not maintained properly.
2. **Tongue and Groove Cladding**:
– **Pros**: Provides a tighter seal against the elements compared to overlap, making it more weather-resistant. Offers better structural integrity and durability. Often considered more visually appealing due to its smoother, seamless finish.
– **Cons**: Typically more expensive than overlap cladding. Requires more precise installation to ensure the tongue and groove joints fit snugly together.
Consider factors such as your budget, climate, desired aesthetic, and how much maintenance you’re willing to do. If you’re in an area with harsh weather conditions, or if you prioritize durability and a more finished appearance, tongue and groove might be worth the investment. However, if cost is a significant factor or you prefer a more rustic look, overlap cladding could be the better option.
There are several types of roofs commonly used for garden sheds, each with its own advantages and considerations:
**Pent Roof**:
– This is a single-sloped roof that slopes downwards from one side to the other. It’s straightforward to build and is often used for modern or minimalist-style sheds. It’s also relatively easy to maintain.
**Gable Roof (or A-Frame)**:
– This is a classic triangular roof with two sloping sides that meet at a ridge in the middle. Gable roofs provide good water runoff and can offer more headroom inside the shed. They also provide extra storage space if you opt for a loft.
**Hip Roof**:
– A hip roof has slopes on all four sides, meeting at a ridge at the top. It’s more complex to construct but provides better stability in windy conditions and can be more aesthetically pleasing. It’s also a good option if you want to collect rainwater as it offers multiple drainage points.
**Gambrel Roof (or Barn-style Roof)**:
– This type of roof has two slopes on each side, with the lower slope being steeper and the upper slope less steep. Gambrel roofs provide extra headroom and storage space, resembling the roof of a barn.
**Mansard Roof**:
– Similar to the gambrel roof but with a shallower lower slope. Mansard roofs provide even more headroom and storage space compared to gambrel roofs but are more complex to build.
BillyOh for sheds
Filed: allotment | Tagged: sheds
Monday, April 8th, 2024
You might inherit a wheelbarrow that’s rusty or falling to bits, or has a flat tyre!
Want to buy a new wheelbarrow?
Choosing the Right Wheelbarrow
Capacity: Consider the volume of the wheelbarrow to suit your material transportation needs without overloading it.
Material: Steel is durable but may rust, plastic/polyethylene is lightweight and easy to clean but less sturdy.
Wheel Type: Single wheels are maneuverable, dual wheels offer stability for heavier loads. Solid wheels won’t pop or rot!
Wheel Size: Larger wheels for rough terrain, smaller for flat surfaces. Pneumatic tires absorb shocks.
Handles: Look for ergonomic handles for comfort and ease of use.
Additional Features: Consider features like folding handles, tray supports, or tool holders for added convenience.
Budget: Determine your budget based on size, material, and features. Prioritize your needs.
Reviews and Recommendations: Research brands, read reviews for insights on durability and performance.
Warranty: Check the manufacturer’s warranty for confidence in quality and durability.
Evaluate your requirements to choose a wheelbarrow that best suits your gardening or construction projects.
Filed: allotment
Sunday, April 7th, 2024
Gather Your Tools: Before you start, gather the necessary tools for weeding. Common tools include a garden hoe, hand trowel or fork, gloves, and a bucket or wheelbarrow for collecting weeds.
Choose the Right Time: It’s best to weed when the soil is slightly moist but not overly wet. Weeding after rainfall or watering can make it easier to remove weeds, as the soil will be softer and less compacted.
Identify Weeds: Take some time to identify the weeds growing in your bed. Some weeds may have shallow roots and can be easily pulled by hand, while others may have deeper roots and require more effort to remove.
Start Weeding: Begin by removing weeds from the edges of the bed and work your way inward. Use a hand trowel or fork to loosen the soil around the base of the weeds, making it easier to pull them out without disturbing nearby plants.
Pull Weeds: Grasp the base of each weed firmly and pull it out from the soil, ensuring you remove the entire root system. Be careful not to damage nearby plants or seedlings while weeding.
Use a Hoe: For larger areas or densely populated weed patches, use a garden hoe to cut weeds at the soil surface. Push the hoe back and forth just below the soil surface to sever weed roots from their base. This method is particularly effective for annual weeds.
Dispose of Weeds: Collect pulled weeds in a bucket, wheelbarrow, or compost bin for disposal. Avoid leaving weeds on the soil surface, as they can re-root and continue growing.
Monitor Regularly: Keep an eye on your allotment beds and monitor for new weed growth regularly. It’s easier to remove weeds when they are small and before they have a chance to become established.
Mulch Beds: After weeding, consider applying a layer of organic mulch, such as straw, wood chips, or compost, to the bed. Mulch helps suppress weed growth, retain soil moisture, and improve soil structure over time.
Preventive Measures: To minimize future weed growth, practice good garden hygiene by keeping pathways clear, rotating crops, and avoiding soil compaction. Consider using landscape fabric or cardboard mulch to smother weeds in areas where you don’t plan to plant.
By following these steps and staying proactive with weed management, you can maintain healthy and productive allotment beds throughout the growing season.
Filed: allotment
Thursday, April 4th, 2024
The Great Allotment Waiting List Conundrum
I get contacted as the allotment site secretary about allotments. People ask in all sorts of different ways for an allotment plot. Some of them have an idea there might be a long wait, or a list and some expect – or even demand – to be allocated a plot instantly.
I ask them where they live and then share with them a map of the allotments in our borough, pointing out ones they will literally drive past to get to our site. I always suggest they apply to those closest to where they live but make it clear they are welcome to visit our site and go on our waiting list.
The visit to our allotment is a great tool to help weed out the allotment-unready. People who don’t want to pop down and have a look are not keen. I can’t imagine turning down a visit to an allotment site and have been known to spend holidays peering through fences and over walls at allotment sites to see what happens in other parts of the country.
I keep the details in a spreadsheet so I can contact them when they reach the top of the list. Sadly, getting to the top of the list takes time and often by the time I contact them their circumstances have changed or the desire for an allotment has gone off. Sometimes I wonder if that’s because it’s a rainy day and if I waited until the sun was shining, they’d be full of enthusiasm for the great outdoors again.
We get contacts from all over the borough. Some people live 6 or 7 miles away and still think it’s feasible to put their name on our list.
The reality is that driving 7 miles here and 7 miles home to water your tomatoes is actually both time consuming and expensive in terms of fuel costs. Google Directions tells me exactly how long it’ll take and where the traffic jams are.
One of the problems where we live is we’re at the low end of the county and many people higher up will experience different weather and not bother coming to our allotment site even though the sun will be out and it’ll be a couple of degrees warmer down here.
I try to discourage people from committing to long journeys not just because of the weather differences but because of traffic. I have had one lady bring the key back on her second visit after the traffic jam took her 40 minutes to get here. Another person visited once in two months and didn’t get past their probationary period. It’s not always the distance. Sometimes it’s just not the right time for people to take on an allotment. I’m always happy to skip over someone if the time isn’t right – and come back to them when another plot comes up. But I need to know.
I refresh this data list annually to check I have people’s correct details still, that they’ve not moved and that they’re still interested in an allotment here. This is the interesting bit.
I phrase the words carefully to elicit a reply. Those people who reply quickly are eager and desperate for an allotment. I know they’ll respond quickly when I actually have a plot for them to come and view.
Sometimes people will have found an alternative site. Sometimes people don’t reply to my email to tell me – and I’m forced into a position where I’m almost harassing people to get a response from them.
I once had someone come back to me 20 weeks after I’d sent him messages asking if he was interested in an allotment. He was keen but again failed to respond to any messages when it was his turn for a plot.
And then there’s the stickiest conundrum of just how persistent should I be in chasing people when they’re at the top of the list? A phone call, email and a text over a couple of days should be sufficient. Very few people go completely off grid for any length of time these days.
I once left it ten days and several messages – only getting an answer service, so I assumed they were on holiday and had left the phones at home. But no, it turned out they just didn’t want an allotment any more and responding to a text with a simple no thanks for just too much.
I get that most people don’t answer the phone to unknown callers and my number will show up in most people’s phones as just a number. But it’s just plain rude and frustrating when people don’t respond to emails, texts or calls.
And yes, you could probably guess from my rant, I have a plot to let and have made contact three times with someone and they’ve not responded. The next person on the list has also had their data check email and hasn’t responded to that.
Spring has sprung and the weeds are growing every day – let me let this plot soon. I know it’s not an emergency to get someone on the plot but every day that does past is a day someone isn’t starting to sow seeds for spring.
Filed: allotment
Sunday, March 31st, 2024
Filed: allotment, Books
|
|